Archive for the zbrush Category

Creature Concept

Posted in Design, sculpting, Uncategorized, zbrush with tags , , , , , , on August 20, 2019 by Jim St Ruth

20-1-4AComp

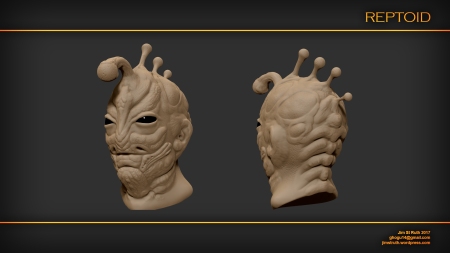
A new creature concept from this morning, which I hope will next clay sculpt. The scales were a happy accident from clicking on the wrong brush in ZBrush without realising; the IMM Scales brush, subdivided without the smoothing option and then hit with one of the mallet brushes. If I do make it in clay, it will be around a half metre in height, maybe a little more depending on how imposing I decide to go with it.

I’ve been working on my areas of focus over the last week or so, ditching some projects so that I’m not spreading my energy too thinly. I’ve decided to stop making props (helmets and weaponry), to focus on my writing and to keep my sculpts organic rather than anything with a machined look. I’ve been getting to bogged down in technical problems with the ‘machined’ work, mostly around having a symmetrical base head to sculpt on. I might revisit this decision later on, but I enjoy the organic sculpts much more.

I’ve now only got one sculpting project on the go, and the relief is significant. ‘The Mother’ is coming along excellently, and most of her form is now blocked out in clay.

This first shot is a few weeks old, and shows the basic form of her head and the basic detail of her halo; this is detachable, and will be moulded and cast separately from the main bust. She’s almost a metre tall including the halo, which is extremely time consuming to detail… holes within holes within holes using a small, round-ended tool.

20190531_195907.jpg

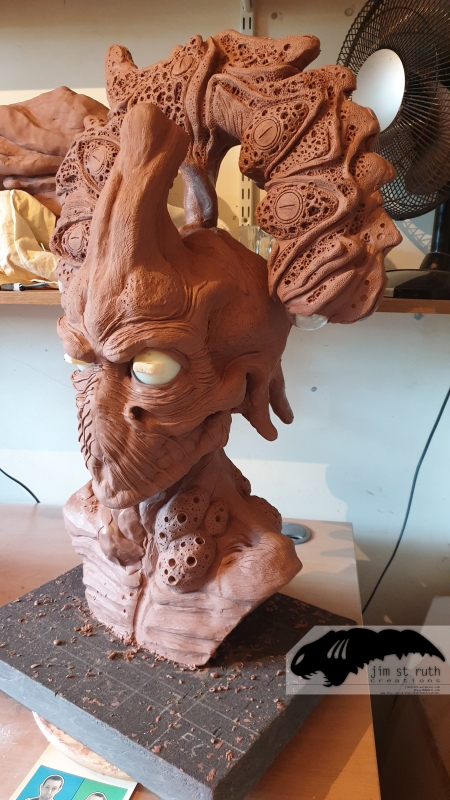
This second shot shows her as I’ve started refining the details, and she’s starting to feel much more real… as real as anything like this could be (mostly in my nightmares). So, to put this piece in suitable context, her eyes will eventually light up and she’ll be another nightlight sculpt. More nightmares!

20190820_095233.jpg

There’s still a lot of work to be done before I consider moving onto the symmetry for her right hand side. Then comes the fine detailing, moulding and casting, before I finish off the halo. I’m going less for ‘old and wrinkled’, which was my original concept, to ‘old with stretched and hanging skin’.

The song ‘Isn’t she lovely?’ is my current ear worm.

Jim.

Resin Helmet: Part One

Posted in 3D, casting, Design, General, Pictures, sculpting, zbrush with tags , , , , , , on June 7, 2019 by Jim St Ruth

I needed some practice splitting a sculpt into several pieces, so that I can make sure I mould my Current Big Sculpt properly (The Mother in the post below)… so I decided to make a helmet!

I’ve included a shot of the ZBrush concept, which I’ve then built on a plaster cast of my own noggin. This cast was wrapped in cling film and then duct tape to protect any clay (as the plaster cast is getting old and flaky, and I’m fed up of picking bits out of the clay when I reuse it!). I then started building the helmet in Monster Clay medium, getting the basic shape down.

After that, I cut off the face plate, which I’ve refined and is now almost ready for moulding. I’ll mould it in silicone with an two-part Easyflo 120 resin mother mould, then cast it in the same resin.

The face plate will then be stuck to the front of the rear piece of the helmet, which will be sculpted, then the face plate removed so that the rear piece can be mould and cast too.

I’m planning on hohlding the two final cast pieces together with rare earth magnets, and it *may* have some lights. The two areas on the side of the head (on the rear piece) that are inset, I’ll cut out and place a dense wire mesh into. I’m *planning* on painting it as worn/ battle damaged, but it shouldn’t take too much work with some fine grit sandpaper to make it much smoother if I change my mind and want a more polished look.

Cheers,
Jim

Resin Gun Prop Sculpt

Posted in Design, General, scifi, sculpting, Uncategorized, zbrush with tags , , , , , , , on November 8, 2018 by Jim St Ruth
Hey folks!
This is my current piece, which was meant to be a quick project but, as I’ve started it, I’ve realised that there’s a lot I want to do…
The first image is just a couple of renders from the ZBrush concept, which I pulled together in about half an hour. It’s not very detailed, but I just wanted to get the forms and masses worked out.
The second shot is of the core of the actual sculpture.
I printed out the side-shot render from ZBrush, scaling the width of the hand grip to 4cm in Photoshop (that’s the distance between my right index finger and the base of my thumb), to make sure that the prop ends up being the correct scale. I then used some spare modelling foam (dense but very light weight to keep the weight of the sculpt down), traced out the outline of the weapon and cut it out with a craft knife. I then sanded it with my trusty mouse sander to try and get it roughly into shape.
The third shot is my current progress, with Monster Clay added over the foam core and sculpted, then buffed smooth with my *amazingly advanced* tools… which, as you can see in that image, is a small pot of white spirit, a scouring sponge, a hog bristle brush and another very fine brush to get a good polish in the tight spaces where I can’t use the back of the sponge.
The final piece will be moulded and then cast in resin, with LED lights inside and a power switch that will act as the trigger, but…
I need the piece to be hollow, both for weight and so that I can add the lights, wires and batteries inside. To give me reasonable access to the hollow innards, I need to cut the sculpt into two pieces, mould and hollow cast them separately, then slot them together when they’re both complete.
This is taxing my mind-brain.
In my head, I can visualise the structure that I need to do this, which looks like a ‘groove and slot’ arrangement in foam or wood, and I’m planning to use magnets to lock the resin cast pieces securely together.
I don’t want to have to cut it up, though, lol. My anxiety is running at volume 9. I think a hot wire foam cutter should be able to do the job smoothly, as long as I’m careful working along some cut-in seams that I still need to add.
This is a lot of fun. I’ve never sculpted and cast a weapon before, and pushing myself to get a good machined look feels really good. It’s going to look damned fine… I hope 🙂

ZBrush Sculpt: Super-Secret Project

Posted in 3D, Design, Masks, scifi, Uncategorized, zbrush with tags , , on October 18, 2017 by Jim St Ruth

For an upcoming something

supersecretProjectJimStRuth2017

??? … Click to enbiggen…

This will be one of my next physical sculpts in Monster Clay… but the reason shall remain a mystery, perhaps for some time…

Reptoid Sculpt

Posted in 3D, Design, Fantasy, General, sculpting, zbrush with tags , , , , , on September 20, 2017 by Jim St Ruth

Part of a series of Zbrush concept sculpts that I might turn into a silicone mask.

The upload quality of the turntable video is pretty awful. It was recorded at 720P and the file on my PC is absolutely fine. Something I need to look at in more detail for the future, I think.

reptoidAll1JimStRuth2017

Fishy Sculpt: ZBrush Turntable

Posted in 3D, Design, General, Masks, scifi, Uncategorized, zbrush with tags , on August 29, 2017 by Jim St Ruth

This might be a long-term project to sculpt and mould into a silicone mask. I guess that the accessories would be made in resin, perhaps with a sintered mental finish that I can polish up. I’ve got another project to finish first, however, and I want to pull more of my focus back to writing.

So, I might never actually make it… but as a mask, I think it would be awesome!

Attack Ship

Posted in 3D, Maya, Photoshop, Pictures, science fiction, Substance Painter, zbrush with tags , , , , , , , , on May 18, 2016 by Jim St Ruth

ship1-1

It’s been a long while since I posted to my blog… Busy world, lots of distractions and a lot of home improvement.

I bought Substance Painter a few months ago, and have been blown away by the ease of texturing a model. With so many filters, so much control and a great ability to customise, paint and make a model worn/ dirty, it’s an exceptional piece of software.

The model was sculpted in ZBrush, then retopologised and UV mapped in Maya.

ZOriginal

Original ZBrush Sculpt

To allow for high resolution textures, there are nine different texture sets/ UV groups, each with their own materials assigned, set up as different objects. The component objects are then unified into a single object that now has multiple texture sets, and it’s exported as an .obj file; importing this into Substance Painter then allows for the different texture sets to be worked on. I’ve included a UV snapshot of three of these texture sets below for reference and, whilst one of them doesn’t fill up the space as efficiently as it might do, it did the job.

The modelling took far more time than the texturing. Completing the ZBrush sculpt was pretty rapid, and I was happy with the overall design. This was created via Dynamesh and then reduced from 5m polygons to 36k using Decimation Master. The model was then made live in Maya, curves drawn across the surface which were then smoothed to make the flow of the individual piece of the model in the next step more regular.

The retopology was then completed at a low resolution; only around 25k polygons for the whole ship. The borders of the model’s pieces were checked with smooth preview, before the next step in Maya.

Substance Painter doesn’t have an option for smooth preview, so to prevent any blockiness the objects need to be at a higher resolution. So the pieces were subdivided, and unwanted edges were deleted. The final object is around 100k polygons which, when imported into Substance Painter, made my machine run like a dog.

However, because I’d UV mapped in groups and created several texture sets, the various pieces can be viewed and worked on in isolation in Substance Painter, speeding things up considerably. It’s also worth pointing out that by cycling through the material options with the ‘m’ shortcut key, you can effectively turn lighting and shadows off, allowing the whole object to be visible with very little slow down.

I was going to take everything back into Maya to render… but the in-built renderer in Substance Painter does a very nice job using HDRI maps for lighting. Since this is just a static image, just some beauty shots of the model and no scenery or posing, I’m just going to leave it as it is.

Head Bust

Posted in 3D, Design, Pictures, science fiction, zbrush with tags , , , , , on June 28, 2014 by Jim St Ruth

HeadBustJimStRuth2014

Exploration Buggy: Test Comp

Posted in 3D, Design, Maya, Photoshop, Pictures, science fiction, scifi, sculpting, zbrush with tags , , , , , on October 9, 2013 by Jim St Ruth

Much to do still: model the rear and inside, and add texturing… but couldn’t resist posting!

testCompJimStRuth2013

Armored Scout Buggy: Teaser

Posted in 3D, Design, Maya, Pictures, science fiction, scifi, sculpting, zbrush with tags , , , , , , , on September 27, 2013 by Jim St Ruth

NewCar1a-JimStRuth2013A quick update of the model. The exterior has been completely retopologised (thanks to the use of Maya’s Quad Draw function and lots of curves to help smooth out the edges and various interior pieces of the body panels). The front wheels now have brake pads and suspension modeled too. The textures are purely placeholders… lots of exciting stuff still to come: interior modelling, full texturing, the weaponry and maybe some exterior armor plating.